Many people use a corporate-licensed version of Microsoft Outlook in the office, but are unable use it at home or on their laptop because the special Microsoft Exchange networking protocols it requires are not available outside the corporate or institutional firewall, or are blocked by the user's own circumstances.
The Microsoft answer is to use Outlook Web Access (OWA), which lets you use a normal web browser to get at your Exchange email account. More recently, for organisations who have moved their email system into the Microsoft cloud, there is O365 (Office 365), which is a similar, much-improved, but still web-based system.
However, many users dislike web-based interfaces to email because they find the appearance and behaviour of a traditional email program (in technical terms, a ‘mail client’) more powerful, more efficient, and easier to use. Desktop Outlook is an email client, but it’s heavy going and clumsy, and is lacking some key features needed by knowledge-workers. There are basically two other ways to skin this cat using non-Outlook email clients: a) clients or plugins which use the Microsoft Exchange networking protocol; and b) clients which use the IMAP email protocol; (there is actually a third: POP, but we don't cover that here).
To improve security, Multi-Factor Authentication (MFA) is being introduced. This adds an extra challenge, usually a code sent to your mobile phone, which you have to type in before you can log in (or even create an account).
Because some email clients don't support MFA (Multi-Factor Authentication), there is a way to get a special pre-authenticated ‘App Password’ from O365 for use with a specific app. Note that you MUST use that App Password with that app each time, not your normal email password. You need a separate App Password for each app you use to read email.
See appendix A, ‘Setting up Multi-Factor Authentication App Passwords’ for details of setting this up.
These are programs or plugins or apps which access Microsoft email the same way as Outlook does, internally, although their user interface (appearance) is completely different.
Hiri is a new email client exclusively for Microsoft Exchange and O365. It does not use IMAP or POP or SMTP, only the Microsoft Exchange email protocols. Although it is marketed as an email client for managers, it offers some significant usability improvements over Outlook/OWA-style interfaces. A major advantage is that it runs identically on Windows, Mac, and Linux.
Download it from http://www.hiri.com or if you use Ubuntu-based GNU/Linux, install it from the Ubuntu Store. At the time of writing, Hiri is free to test for a week, after which it costs €39 a year or €119 for life.
Configuration is automatic: just give your email address and password.
This is a procedure for setting up IMAP (Interactive Mail Access Protocol) email access to Exchange (Staff) and Gmail (Students) using the built-in Android AquaMail app as an example. Similar procedures apply to other products.
Note that the built-in Android Email app does not support O365.
Make sure you are connected to the Internet, either through your phone provider's connection or by wireless
Download the AquaMail app from the Play Store
The first time of use, it should ask you for your email address straight away (see step 4 in this procedure below).
If you have used the app before, pick from the 3–dot menu, click on Exchange Mail, and then click on the button
Enter your email address and password and click
Set the Server name to outlook.office365.com, the Security type to SSL (strict check) and the Server port to 443
Leave the Authentication type set to Choose automatically
Set the Server name to imap.gmail.com, the Security type to SSL (strict check) and the Server port to 993
Set the SMTP server to smtp.gmail.com, the Security type to SSL (strict check) and the Server port to 465
Click
Access to the account will be tested again, and should work this time around. If it fails, check the settings and your Internet connection and try again
Set your name and the name by which you want this account to be labelled, and click
The account is now set up and ready for use.
ExQuilla is a plugin (add-on) for Thunderbird which adds Microsoft Exchange compatibility so that you can access your Exchange account direct instead of via IMAP.
Download it through the Thunderbird Add-ons menu or from https://exquilla.zendesk.com/hc/en-us. At the time of writing, ExQuilla is free to test for two months, after which it costs $10 a year.
Configuration is similar to IMAP except that for Exchange you MUST know your organisation’s EWS server address: this is usually something like efm.company.com/ews/index.aspx (ask your system administrator for the exact address).
ExQuilla has one major disadvantage: being scripted, it is slow when working with very large mailboxes or very large folders.
Hidden under the layers of Microsoft-ese, Exchange does actually still provide standard email services such as IMAP, if they have been enabled by your system administrators. This means you can get at your Exchange email using a standard desktop email client like Mozilla Thunderbird, Eudora, Claws Mail, or Apple’s mail.app, and handheld mail apps like those on Android or iPhone smartphones. IMAP is used because a) it provides SSL encryption for security; and b) by default it does not remove your email from the server when you read it, so when you get back to the office, your email is still there.1
This is a procedure for setting up IMAP email access to O365 (Staff) and Gmail (Students) email using Thunderbird as an example. Similar procedures apply to other products.
If you are using UNIX or GNU/Linux system which provides a Thunderbird package in its repositories, use that instead of the steps below, then continue from step 1 in the procedure ‘Set up an email account in Thunderbird using IMAP’ below.
In your browser, visit http://www.getthunderbird.com
Click on the Download link
Install the program following their instructions
Once the Thunderbird program is installed, double-click its icon (or click on the menu entry) to run it.
If you are already using Thunderbird for other mail, click on the menu
If this is a newly-installed Thunderbird, it will ask you to create a new account and offer you a new account with gandi.net. Ignore this and select Skip this and use my existing email
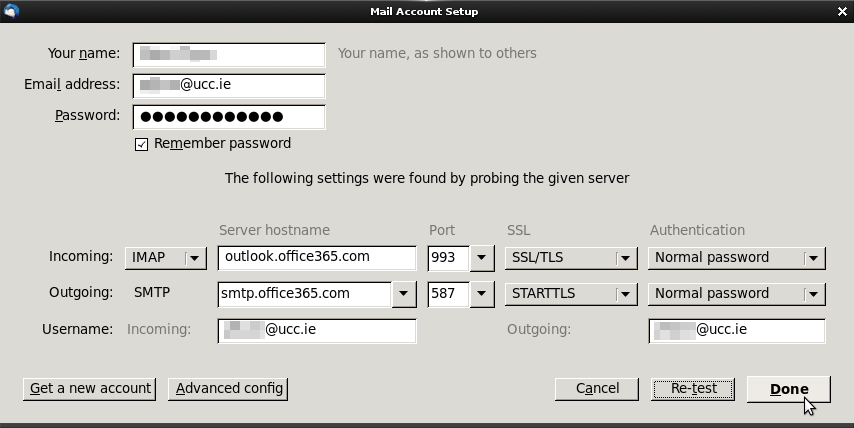
Enter your full name and your UCC email address and password where shown. If you are using a laptop, or if your desktop is in an insecure location, uncheck the Remember password box
Click . Thunderbird will try to guess your server settings, and (in the case of staff addresses) get them wrong (student Umail settings should be correct, see step 5 in this procedure below). Check that IMAP is selected, and click on
See Figure 6 below.
Set the Incoming IMAP server to outlook.office365.com using port 993 and SSL/TLS security with Normal Password authentication
Set the Outgoing SMTP server to smtp.office365.com using port 587 and STARTTLS security with Normal Password authentication
Make sure the Username for both Incoming and Outgoing is your email address
Click
Student accounts are all managed by Google, using the Umail service.
Make sure your Incoming Username is set to nnnnnnnnnn@umail.ucc.ie (where nnnnnnnnnn is your Student Number)
Check that the Incoming server name is imap.googlemail.com (Beware: Google may change this from time to time without notice)
The remaining settings should work as detected
Click to see if Thunderbird accepts the values. If it doesn’t, check them again
When the values are accepted, click Done
Click on to save the settings so far if you need to edit them manually.
Click
The account now exists, but you may need to adjust it:
Click on the new account name on the left, and click on View settings for this account
In the Account Name box at the top, give the account a name like UCC (this is just a label, so it can be anything you want)
Fill in the Organization (use your department or unit name and UCC or University College Cork)
Click on Composition and Addressing in the left-hand panel
To send mail in plaintext only, uncheck Compose messages in HTML format (Why?)
Click
Click on the toolbar icon drop-down and select your new account
Give your email password if asked. Choose whether or not to store the password for later re-use (on a laptop or PDA/cellphone or any shared computer, never store passwords if you can avoid it)
It will take a few minutes the first time to retrieve all your folders. It can take up to an hour for extremely large mailboxes or very slow connections. If it seems to be taking a long time, exit Thunderbird and re-start it
This is a procedure for setting up IMAP email access to Exchange (Staff) and Gmail (Students) using Apple's Mail email program (mail.app) as an example. Similar procedures apply to other products.
The mail.app mailer comes pre-installed on all Macs. Click its ‘postage-stamp’ icon in the dock to run it (or open the Finder and click the icon in the Applications folder, or type email into Spotlight). The first time you use it, it should ask you for the details for your email account (if not, click the menu and pick ):
Select: Add Account
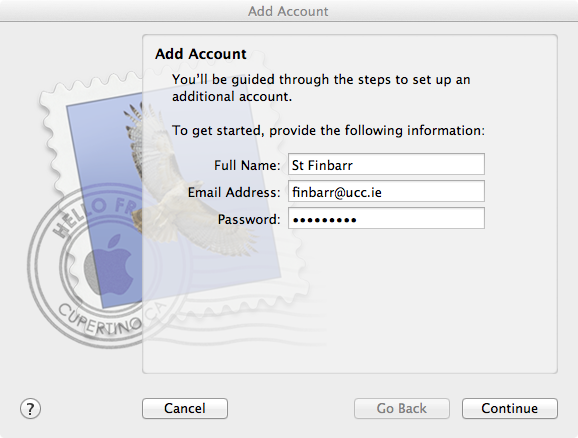
Enter your full name and your UCC email address in the boxes provided
If your computer is in a secure location, enter your email password in the box provided. If your computer is shared with other people, it's safer to leave this blank so that you can enter it later, each time you use Mail. This way, others will not be able to use your email address or read your mail
Click . Mail will try to guess the email server, but in the case of UCC addresses it won't find it, so it will ask you to enter it in the next window:
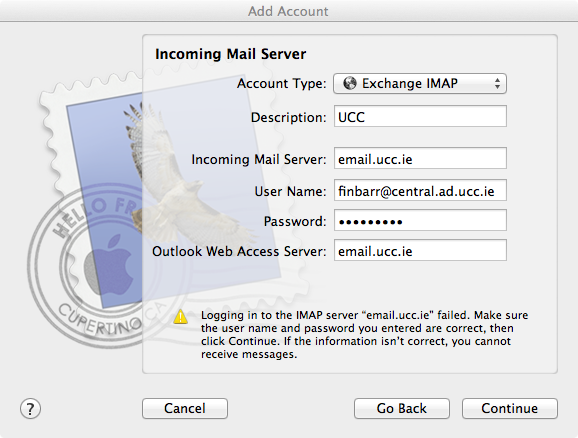
Select Exchange IMAP as the Account Type (for Staff accounts) or just IMAP (for Student accounts)
Type UCC Email as the Description
⇛ Set the Incoming Mail Server to email.ucc.ie (Staff) or imap.googlemail.com (Students)
(Staff) give username@domain.ad.ucc.ie, where username is your Microsoft Windows Logon Username and domain is the Microsoft Networking (Windows) domain in which your username is registered
Your login username may or may not be the same as your email username; it's the username you use to log into the network when you turn on your PC, before you start your email
For all users the domain should now be central. If this fails later, contact the Exchange Administrator via the HelpDesk and ask for it to be checked
If you don't know your username or domain, contact the HelpDesk
(Students) give nnnnnnnnnn@umail.ucc.ie (where nnnnnnnnnn is your Student Number)
Enter your email password in the Password box
For Outlook Web Access Server give email.ucc.ie (Staff only).
Click
If everything was correctly entered, you will be asked to confirm the use of Secure Sockets Layer (SSL) encryption using your password for Authentication. Click
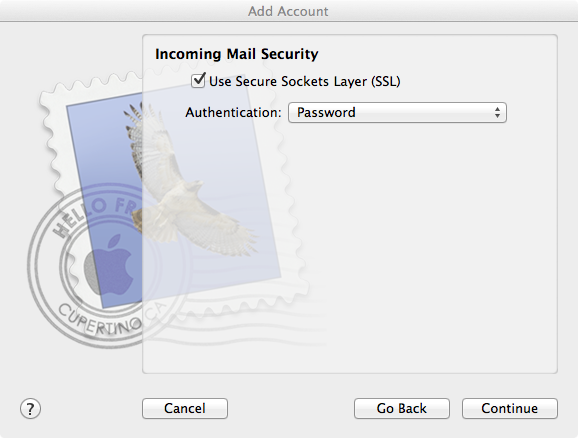
If there were any problems at this stage (for example it says it could not log you in), check and double-check your settings, especially your account username/domain and password.
If successful, you need to set up your outgoing SMTP server. Before doing this, please read
In the Description box, enter the name of your Internet Service Provider (ISP). If you are using Mail when connected to the UCC LAN (wired or wireless), put ‘UCC’ here.
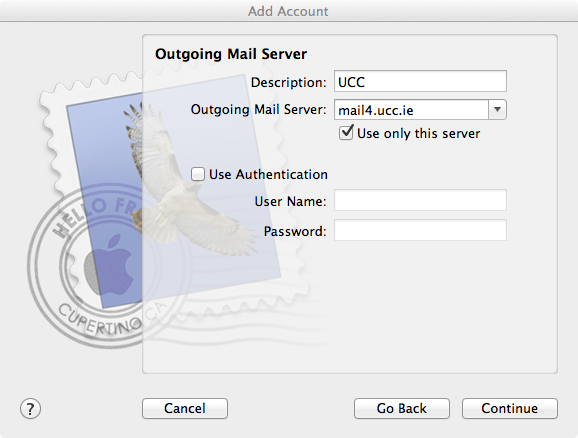
UCC staff connected to the campus LAN (wired or wireless) must use one of the on-site SMTP servers, eg mail4.ucc.ie.
Off-campus, you must use either a) the SMTP server provided by your ISP; or b) the one provided by the network you are connected to (eg in the case of an Internet Café you would need to go and find this out). See [reference to element type "" has not been provided for] for Irish addresses.
If they tell you to use authenticated SMTP, click the Use Authentication box, and give the username and password they have told you to use. Student accounts must use the username nnnnnnnnnn@umail.ucc.ie (where nnnnnnnnnn is your Student Number)
Click on
Some ISPs fail to apply their security certificates correctly to their SMTP service. If you get a pop-up warning about the security certificate, and you trust your ISP not to have been sabotaged, click on Continue
If you use the UCC server, you can set Authentication to ‘none’ because it will only send email for UCC addresses anyway.
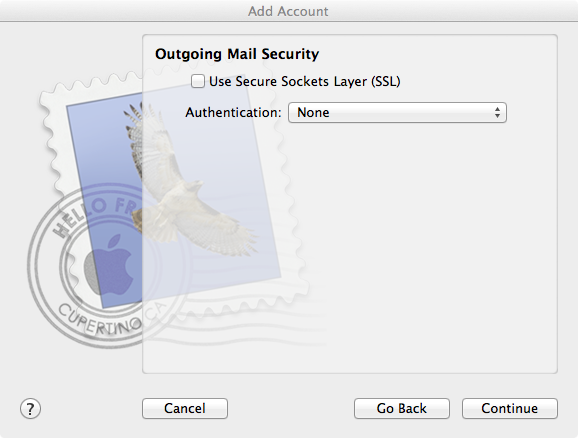
If all was successful, and the details are all correct, click in the Take account online box and click
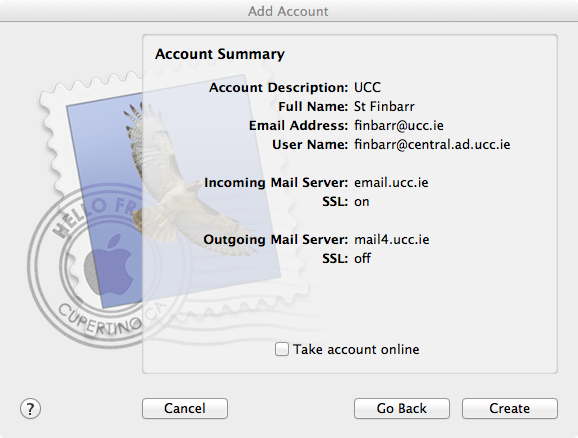
You should be asked again now for your email password. Type it in, and decide for yourself if you want Mail to remember it in your keychain or not
It is very strongly recommended that you set your default font for plaintext messages to Fixed Width. Click on and select the Fonts & Colors tab and make sure the box labelled Use fixed-width font for plain text messages is ticked.
Click on the Inbox to get your mail.
It will take a few minutes the first time to retrieve all your folders. If it seems to be taking a long time, exit Mail and re-start it
Note that the first time you send mail using a non-UCC ISP, it may also ask for your ISP's password for the SMTP server username you set up in the procedure Configuring the SMTP server above. This is usually the same password you use when connecting to your ISP (not relevant for broadband users). As with any password, on a laptop or tablet/cellphone or any shared computer, never store it
The alternative (POP) was insecure (now fixed), but by default it deletes your email from the server once it has downloaded it, so you end up with your email on your laptop or desktop at home, or on your phone or PDA, and not in the office. ⇚
: Key words for use in RFCs to Indicate Requirement Levels (1997).
 Keep up to date with our RSS newsfeed Keep up to date with our RSS newsfeed |
, Electronic Publishing Unit • 2018-08-01 • (other) |